 Nginx server code depicting an automatic redirection from HTTP to HTTPS
What type of work did I perform as a software engineering intern at a Medical AI startup?
Due to the nature of working at a 2-year old startup with a development team sized at only 5 people (make that 6 as of the final weeks before I finished my internship), working as an intern meant becoming a regular member of the dev team.
Despite the challenges of working at a tech company made up of native Hebrew speakers, I was integrated into the team and began working on vital parts of their full-stack development environment. While tasked with an overarching project when there was no other work allocated to me, I continued to work on various parts of the Aidoc stack and became extremely familiar with Python web applications, production-grade server development, RESTful APIs, and informative error tracking.
Below is an in-depth look at the work I did while at Aidoc Medical for 10 weeks!
All code for the projects can be found here.
De-Minifying JavaScript with Source Maps in Electron-Vue Applications
An important part of Aidoc’s product is an application shipped to radiologists for use in their PACS setup. This application is written with electron-vue. Of course, when the application crashed or threw a nasty exception, we would have to discover its origins with an in-depth stacktrace using a service such as Sentry.io.
However, Sentry doesn’t play well with minified JavaScript code (which electron-vue serves up in its builds) and stacktraces become practically indecipherable.
Objective: Create a test electron-vue project and build a simple app that crashes and routes its crash data and stacktrace to Sentry.io. Note that all electron-vue files are packaged with electron-builder and minified with Babili upon compilation. Our goal is to generate a sourcemap using Webpack that can provide a full stacktrace to Sentry.io. The following solutions assume you follow the Sentry docs regarding source maps.
The bundled and minified code is found in [app_root_folder]/dist/electron. All the Webpack configuration specifying settings are found in [app_root_folder]/electron-vue in the 3 webpack configuration files:
webpack.main.config.js
webpack.renderer.config.js
webpack.web.config.js
We’ll be working with webpack.main.config.js for the purposes of this solution.
Importantly, Webpack is able to generate a source map during minification through the use of the devtool field. BUT none are generated for some reason which is the root of the problem.
This important field’s documentation can be found here. It’s also specified in the Sentry docs as being a way to create source maps. While this file has no devtool field, webpack.renderer.config.js and webpack.web.config.js contain cheap-module-eval-source-map as the style of source mapping (note that those files don’t generate a map either).
I found that changing the devtool field to a different mapping (we have 12 to choose from) was able to generate .js.map files in some cases. It turns out that the Babili-Webpack plugin is bugged and can’t generate some source map styles in its current version.
Add "webpack-sources": "1.0.1" to the devDependencies field in package.json.
const SentryWebpackPlugin = require('@sentry/webpack-plugin');

let mainConfig = {
  devtool: 'source-map',
  // other configuration
  plugins: [
    new SentryWebpackPlugin({
      release: 'release: 'process.env.NODE_ENV',
      include: './dist',
      ignoreFile: '.sentrycliignore',
      ignore: ['node_modules', 'webpack.config.js'],
      configFile: 'sentry.properties'
    })
  ]
};
Like so:  A working Sentry-Webpack configuration
Remember to include with source-map. It is one one of the few source map styles that work with the bugged Babili-Webpack plugin.
This successfully generates a source map alongside the minified file. Right now, the minified file does not upload to Sentry successfully.
It looks like the map files are correctly uploading now. To get them to automatically upload, you must use the sentry-cli program with the command: sentry-cli login. If you can’t access sentry-cli, it is found in [app_root_folder]/node_modules/.bin.
You will login and copy and paste the auth token from the browser window that opens. Enter it and a .sentryclirc will be created in your application’s root folder. It is now ready to ship source maps automatically now. Below I verified that they did upload automatically in the Releases -> Artifacts section.
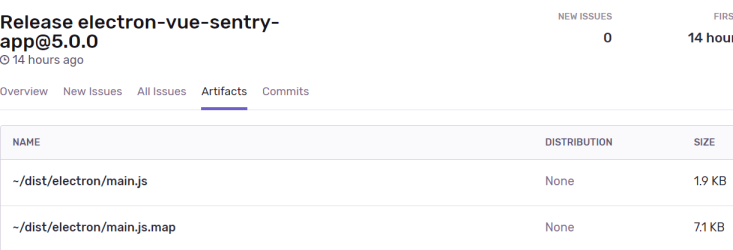 .js and .js.map artifacts
However, the .js.map and .map files still don’t show correctly on the Issues page and it looks as though others have run into similar problems before with different source map styles:
 Sentry refuses to use the source map we generated
Use this small program that reads your source map file and tests a mapping (remember to install source-map through npm first):
var fs        = require('fs'),
    path      = require('path'),
    sourceMap = require('source-map');

// file output by Webpack, Uglify, etc.
var GENERATED_FILE = path.join('.', '[YOUR_MAP_FILE_HERE]');

// line and column located in your generated file (e.g. source of your error
// from your minified file)
var GENERATED_LINE_AND_COLUMN = {line: 1, column: 1000};

var rawSourceMap = fs.readFileSync(GENERATED_FILE).toString();
var smc = new sourceMap.SourceMapConsumer(rawSourceMap);

var pos = smc.originalPositionFor(GENERATED_LINE_AND_COLUMN);

// should see something like:
// { source: 'original.js', line: 57, column: 9, name: 'myfunc' }
console.log(pos);
Despite our intense debugging and a properly uploaded source map, we Sentry.io refused to automatically use our source map. We have reached out to Sentry Support with no response at this point. For now, we are leaving our files bundled but unminified and using those stacktraces until we can find a better solution.
Comment out the line new BabiliWebpackPlugin(), in webpack.main.config.js.
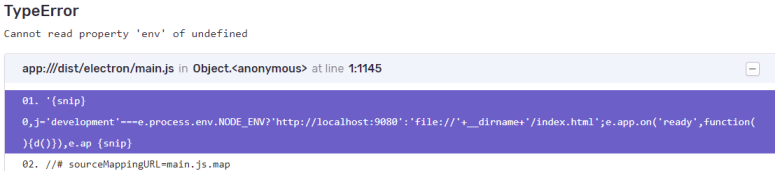
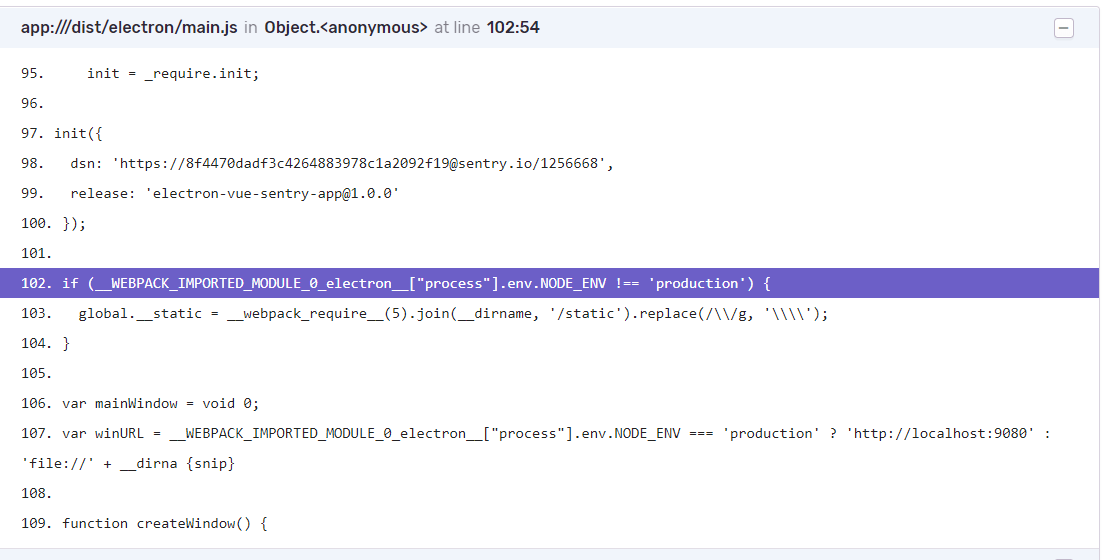 Webpack now bundles all the files without minifying them in the process and the stacktrace appears like this:
Of course, this comes with the downside of not having a minified build file but it seems like this is the only solution when Sentry fails to recognize the map files that are clearly there. Changing the build to be in development mode rather than production mode also works.
Routing Sensitive Stacktraces Through HIPAA-Regulated Networks
We also host an Electron app that is installed on the computers of radiologists inside hospital networks. Of course, we had to handle similar crash data using Sentry.io. The twist here was having to use our own secure server approved by HIPAA regulations that could take any crash data from the Electron app and act as a reverse proxy to send the data to Sentry.io.
Objective: Configure an HTTPS route to a local Nginx server which will then send a query to Sentry.io. To do this we would need to create a self-signed SSL certificate. Configure the Electron app’s Sentry’s SDK to send data to this HTTPS port. Essentially, we are routing all crash data from the Electron app through a HTTPS Nginx server before using the server as a reverse proxy to send the data to the Sentry platform. This is required due to the limitations of the hospital network that only allow access to a virtual machine and no other internet access.
The following are a few of the important files vital to the process:
Electron:
Main.js (contains basic Electron app structure)
Nginx:
Nginx.conf (contains server configuration and HTTP to HTTPS redirection)
Access.log (log of all data to and from server)
Sentry:
Sentry.js (contains DSN)
Our DSN is in the form https://[PUBLIC_KEY]@[HOST]/[PROJECT_ID]. The important aspect of this is that the host is sentry.io. Clearly we can’t use this configuration for our architecture where the hospital and its Electron app does not have access to the internet. So, we must route it through our localhost server running Nginx instead:
 My unique Sentry.io DSN
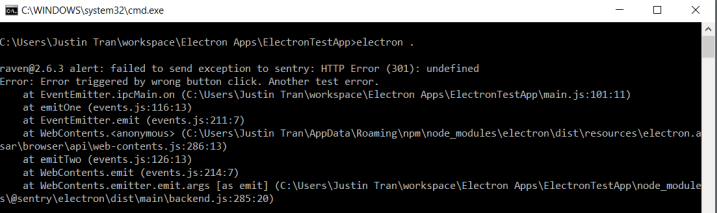
Note that our Nginx server must be started to begin this. Also note that we changed the host to be localhost (our Nginx server) and that the DSN is still HTTPS. Unfortunately, it turns out that Raven does not appreciate that our server uses a self-signed certificate. Raven throws an exception and our crash data fails to be routed through Nginx.
 Nginx doesn’t play well with self-signed certificates, even if they’re for testing purposes
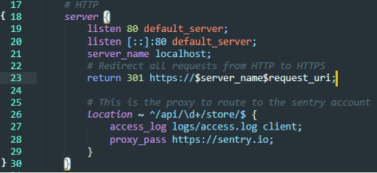
Possible Solution/Shortcomings: Seemingly the only way around this error is to send the DSN without HTTPS and with HTTP instead. Everything works perfectly when the crash data is routed from Electron to our HTTP configured server and finally to the Sentry server (which is HTTPS) but this is obviously not secure. An alternative solution is to let our Nginx server config handle the redirection from HTTP to HTTPS instead (note that this works but is not secure)
Alternative Nginx.conf description:
Lines 17-30 contain the server configuration that can be accessed through localhost or http://localhost. This does not utilize any certificate and is therefore unsecure. This is why line 23 redirects all requests to http://localhost to https://localhost which is secured with a self-signed certificate. We want our data to be secure when making requests to and from the Nginx server which is why we use SSL or TLS.
Lines 25-29 contain the proxy that takes the data sent from the Electron app crash and Sentry’s Raven client (which handles and reports all crash data in a form that can be read by Sentry). The location directive contains a regular expression that handles data sent from Raven in the query form: …/api/PROJECTID/store. This code was provided by a developer on the Sentry forum.
Lines 33-65 contain the HTTPS configuration for our server. It is self-signed with an SSL certificate as seen in lines 37-41 and also password protected by a simple test username and password as seen in lines 43-45. Links to webpages and access to images stored in the server’s root are provided by location directives in lines 47-59.
Lines 52-53 were used for testing the sending of HTTP requests to the server. Nginx servers hosting static pages do not allow POST requests (HTTP code 405) so a workaround was made in which GET requests with a request_body were sent to the server instead and 405 errors were converted to HTTP code 200 (success). This was all logged in access.log to ensure that HTTP requests and data sent to and from the server was making its way through Nginx effectively
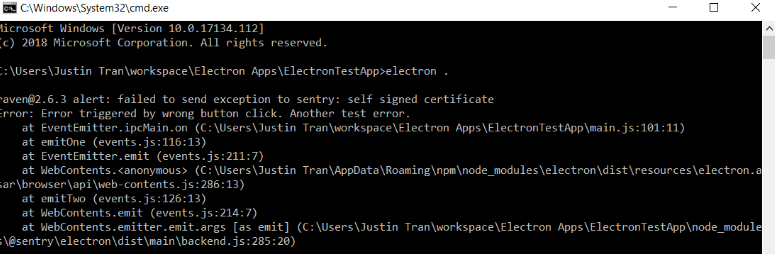
NOW, our solution hinges on line 23 being either HTTP or HTTPS: This redirection works perfectly when simply querying the server for example at http://localhost and visiting the static webpage. However, this does not work when redirecting the DSN from Raven. Instead, we receive an error like so:
 The DSN cannot be routed from HTTP to HTTPS through Nginx and eventually to the Sentry platform because of an undefined error.
The DSN cannot be routed from HTTP to HTTPS through Nginx and eventually to the Sentry platform because of an undefined error. It must solely be through HTTP because Sentry does not want unsecured data anywhere during data transfer. Unfortunately we had to stick to this HTTP solution.
Choosing the Perfect Python WSGI Server for Your Windows Environment in 2018
Another annoying aspect of working with tight restrictions due to HIPAA was the limited set of hardware that radiologists were able to work with. Nearly all the machines we developed for had to be Windows and as a result, building purely for Windows required using Windows-compatible tools at some points.
Therefore, choosing the correct Python WSGI server that could handle high loads was extremely important for the wellbeing of the application as Aidoc scaled to larger operations.
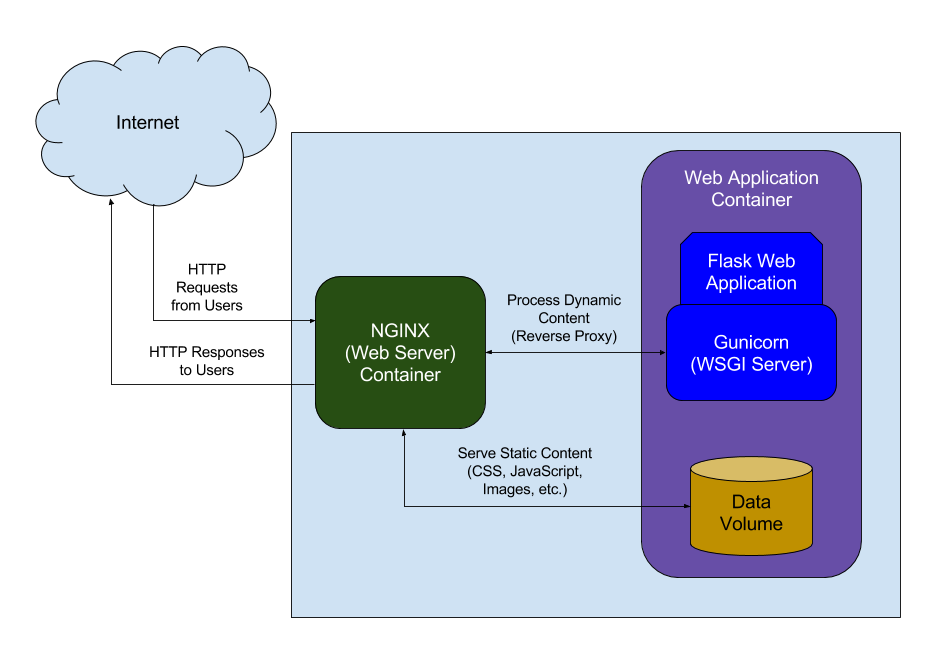
WSGI has two aspects. It is made to let web servers (such as Apache or Nginx) forward requests to web apps or frameworks written in Python.
- Server/Gateway side: Full web server or application that communicates with server
- Application/Framework side: Python callable supplied by program or framework
For example, a WSGI-compliant server such as Waitress or Gunicorn hosts a WSGI-compliant web app (such as Flask or Django).
 A WSGI server (meaning WSGI compliant) simply receives the request from the client, passes it to the application and then sends the response returned by the application to the client
WSGI is built to be synchronous but some of the implementations we test have workarounds to this. Note that many WSGIs are placed behind a reverse proxy such as Apache or Nginx to use a HTTPS URL scheme or support a SSL connection.
The reverse proxy commonly handles static requests while passing off all other requests to the WSGI.
We chose between 5 different WSGI Servers compatible with Windows, of which only 3 were even acceptable as others had poor performance.
Our candidates were Waitress, CherryPy, Twisted Web, mod_wsgi, and gevent (the WSGI currently in use and the one we were hoping to replace as soon as possible).
3 forms of load-testing operations were tested against each of the servers. Each was administered using JMeter to create “threads” or “users” emulating actual traffic:
- 1000 (linearly growing) users over 1 minute
- 1000 immediate, concurrent users over 1 minute
- 1000 immediate, concurrent users over 1 minute and maintained for another minute
Let’s get right to the results measuring the percent error (percent of connections dropped):
    |             | Waitress | CherryPy | Twisted Web | mod_wsgi | gevent |
    |:-----------:|:--------:|:--------:|:-----------:|:--------:|:------:|
    | Test 1 Avg. |   0.00%  |   0.00%  |    0.00%    |   0.00%  |  0.00% |
    | Test 2 Avg. |  18.12%  |  17.71%  |    33.67%   |  34.89%  | 20.51% |
    | Test 3 Avg. |  30.87%  |  26.97%  |    52.02%   |  50.93%  | 51.37% |
Waitress and CherryPy are the best WSGI servers of choice for a modern Python WSGI server in need of speed and high load.
Why are there any errors at all? Shouldn’t a WSGI be able to handle any load?
Even with stacktraces I was not able to pinpoint a direct cause of these errors though I did log and trace many of these errors to HTTP 502 errors to the server. The 502 Bad Gateway error likely resulted from WSGI workers trying to handle the requests only for some of the requests to time out resulting in errors.
I have a theory that it is related to the standard I/O registry value in Windows that determines the number of open files at any time (limited to 512 by default). For more info, view this page.
Nonetheless, with the correct configurations from the possible configurations I listed for each WSGI in addition to the configured Nginx server ideal for our network settings, the tests are all standardized and Waitress and CherryPy would at the very least be able to handle the highest number of concurrent requests.
I also confirmed my suspicions about why there were so many errors from HTTP 503 error codes using each WSGI. It is a combination of Windows’ low open file limit and unconfigured server settings that would replicate a production setting. Here is a Github comment about a similar issue. It shouldn’t be an issue in production especially by using better hardware with correctly configured threads.
Conclusion: CherryPy is the fastest and responded the best to handling high loads. Waitress was the simplest to use because of its lack of dependencies and close integration to Python but was slower. Twisted Web was difficult to work with as it has undergone heavy renaming and revamps through the last few years. It also performed staggeringly worse than the other WSGIs, having an average error rate of ~50% in test 3 when the others hovered ~30% or less. mod_wsgi is commonly found due to being one of the first production-ready WSGI servers and has a wealth of documentation over the years but is now outperformed by modern WSGIs. It is also tied heavily to Apache which is not as beneficial if our developers are already used to Nginx. The performance was quite disappointing as it was similar to Twisted Web and the installation process was slightly confusing coming from somebody that had never interacted with Apache before. The best WSGIs were CherryPy and Waitress and while CherryPy handled high loads better, Waitress was easier to implement and configure (though they were both very easy to implement). CherryPy and Waitress configurations are simply arguments to the Server class and serve() function, respectively.
Regarding Load-Testing on Windows
Note that every HTTP connection on a machine opens a new file descriptor. Windows sets a low limit for the maximum number of files that can be open and as a result, a limit less than the number of simulated users in a test will cause failures to occur before properly testing the actual load of the WSGI.
This author also notes the same problem I addressed earlier with Windows and the open files limit. They write:
“In case you hadn’t guessed it already then the odd one out is Windows. Nginx on Windows is really not an option for anything you’re going to put into production. Windows has a different way of handling event polling and the nginx author has chosen not to support this; as such it defaults back to using select() which isn’t overly efficient and your performance will suffer quite quickly as a result.
The second biggest limitation that most people run into is also related to your OS. Open up a shell, su to the user nginx runs as and then run the command
ulimit -a. Those values are all limitations nginx cannot exceed. In many default systems the open files value is rather limited, on a system I just checked it was set to 1024. If nginx runs into a situation where it hits this limit it will log the error (24: Too many open files) and return an error to the client.”
How do the WSGI servers work at the low-level?
Waitress
- • Multi-threaded (rather than multi-processed using fork())
- • Synchronous (normal for WSGI) and asynchronous (not normal for WSGI) code is used
A channel is created for each client that connects to the WSGI server All requests with that client are made over the channel’s connection. When a channel receives a full HTTP request from the client, it schedules a task for the main thread to allocate. A main thread maintains a fixed pool of worker threads to handle tasks (parallelism). The default pool size is 4 by default.
If a worker thread is available, it will handle the task that was scheduled When all worker threads are in use, a task will be buffered and wait in a queue for a worker thread to become available. The main thread is asynchronous while the workers are synchronous. Worker threads never perform I/O, it is only done by the main thread and many clients can be connected to the server at once because of this. Worker threads will never be hung up trying to send data to a client with a slow network but with a maximum of 4 requests being handled at a time (by default).
CherryPy
- • Multi-threaded (rather than multi-processed using fork())
The general idea behind threaded handling of requests is similar to Waitress with a few notable differences.
The server maintains a single, main listening thread and places incoming connections from clients onto a queue. The main listening thread is not asynchronous as it was implemented before 2016 when Python 3.5 was released with async features Worker threads are also kept in a fixed pool and handle tasks off the queue as they’re popped off.
Gevent
- • Looks very much like traditional threaded programming, but underneath does asynchronous I/O
- • Uses greenlets
A “greenlet” is a small independent pseudo-thread. Think about it as a small stack of frames; the bottom frame is the initial function you called, and the topmost frame is the one in which the greenlet is currently paused. You work with greenlets by creating a number of such stacks and jumping execution between them. Greenlets will only yield to other greenlets with a user-implemented yield command whereas traditional threads will yield to other threads when decided by the OS.
Event loop: An event loop is run by a special greenlet called the hub. Instead of blocking and waiting for socket operations to complete (polling), gevent arranges for the OS to deliver an event letting it know when, for example, data has arrived to be read from the socket. gevent can move on to running another greenlet, perhaps one that itself now has an event ready for it. This repeated process of registering for events and reacting to them as they arrive is the event loop.
Greenlets all run in the same thread. This means that until a particular greenlet gives up control, such as with the sleep() function, other greenlets won’t get a chance to run. In addition, only one greenlet runs at a time. Multiprocessing is known to cause problems with gevent’s use of monkey patching (reopening a class or method at runtime and changing its execution). Therefore, gevent takes advantage of concurrency by using context switching but not parallelism.
Incidents Management Platform Solutions
When our virtual machines on Microsoft Azure and Amazon Web Services running Kubernetes containers for machine learning training crashed (and it happened often), we found errors to be difficult to trace. Even worse, it become difficult to pinpoint the solution when hundreds of metrics were taken into account at any moment. So, the solution was to take advantage of an incident management platform. I decided to choose between PagerDuty, VictorOps, and OpsGenie.
Below is some POC test code that I wrote for each of these incident management services. Along the way, I compared the feature-sets of each possible service and made a decision for our startup to prevent future failures that would go undetected.
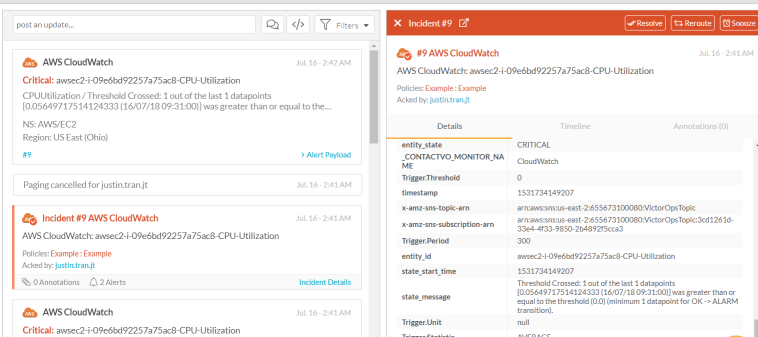 Our VM alerts from AWS clearnly appearing in VictorOps
Having a working incident management solution that would integrate with our virtual machines performing algorithmic training on AWS (and old VMs on Azure), was essential to the efficiency and success of our machine learning platform. We were far too used to coming into work in the morning and realizing that our entire virutal machine had crashed early into the night.
With these solutions, we were able to create alerts in our cloud service of choice, integrate them to signal an incident in VictorOps (the service that I eventually chose and the one that the software engineering team took on), perform an analysis with integrataed Logz.io metrics from the ELK stack, and resolve the issue as soon as possible so that our precious server time was not wasted.
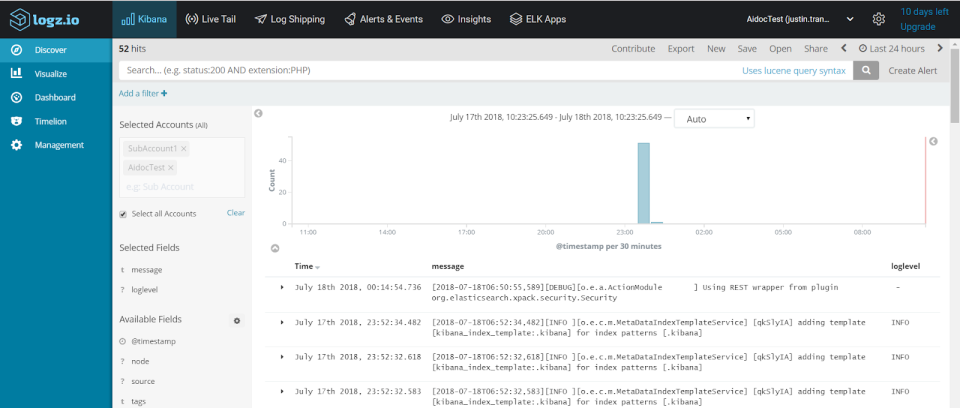 An example of logs successfully shipped from the ELK stack to Logz.io
Note that this included writing my own integration between Microsoft Azure and VictorOps which I wrote about here.
The guiding principles for choosing between the three incidents management solutions boiled down to two key concerns:
- Possibility of integration with Microsofy Azure and AWS
- Ability to view raw data and metrics created by Logz.io and from our own queries
While this project required less code than one might imagine, choosing the appropriate service to integrate into our architecture was, of course, incredibly important to maintaining a working product for our customers.